In the previous articles in this series, we’ve discussed the following aspects:
- The reasons why many drummers do (and should!) record themselves playing drums
- What to consider for the drum cover to look good
- What to consider for the drum cover to sound good
Many will just flip the camcorder (or web cam!) on, press record, and play, without regard to lighting, camera positioning, the tuning of the drums, etc. Well, you’ll get a recording, but it may not look and sound as you’d like. A little bit of effort needs to be put forth for the recording to look and sound quality.
Well then, let’s say you do take the time to make sure your video looks and sounds good. You’ve paid attention to the details as far as lighting, camera positioning, a good sounding mp3, etc. You have the recording – now what? Now you want to publish the video for all to see. For that, you’ll need video editing software.
There are a multitude of options in the market for video editing, with pricing ranging from a few dozen dollars to several hundred (and even thousands!) of dollars. The program that will do absolutely everything for you is most likely out of range price-wise for most, so the quest begins for determining which program will suit the needs of the drum cover recorder. But that presents a problem in and of itself.
We’re drummers and not necessarily videographers! Even though we want to record good drum covers, the fact is that we really just want to play, and get better at drumming, so we spend a lot of time trying to get better at that. Who has time to be an expert video editor? or even a semi-expert? Granted, this generation is more computer and tech-savvy than ever before, and some are adept at making clever videos. But this isn’t always the case (as you can see in many YouTube videos!).
The drummer could hire someone to edit their drumming videos for them, but most simply don’t have the money to do so. You could get a friend to do it, but that may be hit or miss – you may get a good final product, or you may not, depending on how good the friend is. This may be an option though, if they know what they’re doing. But in the end, it should be you, the drummer, who has the final say, on what your video should look like. You’re the director! It gives a lot of pride and satisfaction when you’ve recorded a drum cover, gone through the editing process, and produce a video where you had complete control over the content and presentation. It is definitely something worth working towards.
As we mentioned, many video editing products are simply beyond the reach financially for most drummers. There are some who have the luxury of expensive video equipment as well, but that’s not the case for most drummers. However, there is a price that every drummer can afford: free. And if you have [a computer and] Microsoft Windows, you most likely already have a video editing program that will get the job done as far as getting a decent looking and sounding drum cover. That program is Windows® Movie Maker.*
Certainly, there are a lot of things that Movie Maker cannot do, and some may criticize it for being too ‘simple’ a program, or too restrictive. But remember, we’re not talking about winning the Oscar for Editing – we’re just recording a drum cover! And frankly, Movie Maker is very adequate for this type of editing.
Movie Maker is actually a better video editing program than most give it credit for. I’m not here to tout the virtues of Movie Maker per se, but many will criticize it simply because it’s from Microsoft. Yes, many times their software is released somewhat ‘buggy’, but they get corrected via hot fixes and patches eventually. The fact is that this free video editing program is more than adequate for making not-so-elaborate drum cover recordings that look and sound great – the only thing limiting those last two little items is the equipment you’re using to record.
As far as the actual program itself, I use version 6, which comes with Windows Vista. I believe it looks and works the same in Windows XP, but Windows 7 includes a revamped version of the program that I’m not familiar with. Although I will be focusing on the Windows 6 version, the same principles will apply to all versions.#
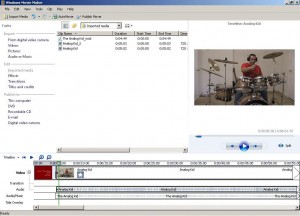
Here’s a screenshot of my workspace when I was editing my drum cover of Rush’s “The Analog Kid”:
Movie Maker has a simple layout, very unobtrusive, that will allow you to get right to editing your video without a lot of fluff. At the top, you see the media list, both audio and video, that I’ve imported for this project. There’s the mp3 of the original song, and two video takes. Depending on what you want to do, you can merge different sections of each take via transitions and make it look as one take. If you have only one camera, this is a good way of incorporating multiple camera angles.
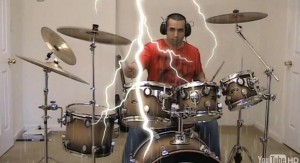
Under the ‘Tasks’ section, you’ll find the ‘Edit’ section where you have a palette of effects (about 50 or so) that you can incorporate in your videos. In some of my later covers (such as “Jacob’s Ladder” and “That’s What You Get”) I incorporate some of these effects.
Speaking of transitions, there are several different kinds as well, such as fades, heart shaped, dissolve, spin, slide, flip screens, and on and on. Sometimes the song you’re playing will dictate which effect or transition you want to use. The more you use the program, the more creative you will become.
The bottom of the workspace shows your timeline. Here is where you can split the video and add your transitions and effects, and add your beginning and ending titles (if you want them). In this example, you can see the audio spectrum of both your video and your mp3. You can actually zoom in and use the visual spectrum to align the video’s audio with the audio of the mp3, to ensure no ‘double sounds’.
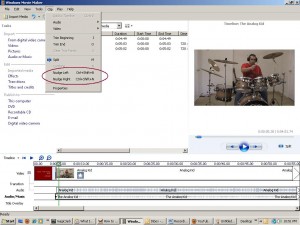
Two of your best ‘friends’ in Movie Maker will be the ‘audio level’ feature and the ‘nudge’ feature. The audio level allows you to control the volume of the video relative to the volume of the mp3. That way, you can determine how loud you want your drums (in the video) to sound in relation to the drumming in the mp3. If done right, both by your playing and the proper volume of your playing, you may be able to achieve that only your drums can be heard, and not the one on the original song.
The nudge feature allows fine audio/video alignment of the sound. You can move the audio (the mp3) left and right in very small, minute increments to get the audio aligned just right.
The ‘Publish To’ section allows you to save your finalized video in a format ready to upload to YouTube, or any other video platform. I almost exclusively use YouTube, except for very few exceptions. YouTube is so pervasive that it’s almost not worth using the others, especially when starting off. The only option I’ve used under this section is ‘This Computer’. That way I have the video saved in its final format, and I can do with it whatever I want after that.
So, in this ‘recording drum covers’ series we’ve discussed the basics as to what it takes to record quality drum covers, with just your camcorder and Windows Movie Maker. As mentioned, many drummers have at least these two items, so if you have them, you’re on your way! But we’ve only scratched the surface.
TheParadiddler.com is in the process of preparing a step-by-step guide, from inception to production, on how anyone can record their drum cover, and be proud of the result! Some of the subjects to be discussed in detail are:
- Why you should invest in a camcorder (it doesn’t have to be top-of-the-line – not even close)
- The importance of a quality mp3
- Drum tuning tips
- Lighting details
- Camcorder positioning
- How to ensure you start playing exactly when the drumming starts (when the drums start on the first note of the song)
- Putting video and mp3 together in Movie Maker
- Effective use of transitions and effects
- How to merge multiple camera angles
- How to ensure audio between video and mp3 is synchronized, every time
- and so much more!
Let me clarify what this guide will not be: it will not be a manual on how to use Microsoft Movie Maker. The ‘Recording Drum Covers’ guide has one purpose: to assist drummers with limited funds to use Windows Movie Maker to edit quality drum covers – that’s it. So whatever features Movie Maker has that will help you edit a great drum cover, that is what will be discussed. There are books that are dedicated to Windows Movie Maker itself, but they are very general in nature. If you want to use Movie Maker, which you most likely already have, to edit your properly recorded drum covers, this is your guide.
The guide will also be presented based on the author’s experience. There hardly ever is just one way of doing something. It may well be that you’ll see that I present how to do a certain thing, and you may think I’m going about it completely the wrong way! If that’s the case, your input will be greatly appreciated! I hope this becomes a collaborative endeavor, where ideas can be shared, where we’re all looking for the most efficient way of doing things. Count me in!
Movie Maker is not the best video editing software out there, not even close. But for being free, it is excellent! 🙂 One of the benefits of using Movie Maker, at least in the beginning, as discussed in the opening article in this series, is that once you get proficient at it, you’ll be better aware of what it can and can’t do. This will allow you to make an informed decision on what more sophisticated video editing software you will upgrade to, if that’s what you want. So you not only will make great drum cover videos, you’ll learn something about video editing in the process! You’ll be able to talk from an informed standpoint to others more versed in editing, so there’s less confusion should you later ‘outsource’ your editing to someone else.
The guide is in the process of being put together (as of this writing), so if you have any requests or questions regarding what you’d like to see explained in the guide, just shoot me an e-mail and I’ll consider it.
There is great satisfaction when you work hard to prepare your drumming space, ensure the drums are well tuned, that the camera is in place, that you play really well, that you then edit the video – to then see a final product that you can be proud of, and that others viewing it like it too. So stay tuned! Hopefully this ‘Recording Drum Covers’ introductory series wets your appetite and incites you to not only play the drums well, but present yourself in a good light as well!
______________
*The focus of this ‘Recording Drum Covers’ series has been on Windows Movie Maker. Apple has very good programs as well for video editing, and some of the principles discussed in this series can apply to whatever equipment and software being used.
#This was the latest version as of the writing of this article. At the time the course is produced, the version used will be indicated.


 All rights reserved.
{ 1 comment… read it below or add one }
thanks!!!! this helped me a lot for making my drumcovers!!! 🙂